Introducing LISTORIO!

It truly has been a while since I posted anything. Last post was in 2018!

Today, I would like to introduce a new project I created, Listorio

Variation of this project has been in my head probably since early 2000’s, when Internet popularity exploded (and businesses imploded). I’ve always wanted to create my list of anything, and put it out there in the internet to be found and shared.

I just had this rush of wanting to create something, and this idea came back to me, so I spent about two weeks after working hours to create it. It does everything I want, so the next is to create a lot of my own lists and share them. I will try to market it different ways here and there, so I could test whether it’s something people want (like Y Combinator‘s motto – Make something people want). I am a person, so it should count! :D

Here are some lists that I had created.

When JSON encoding does not play well with character encoding

There comes a time for a developer to face a bug so weird that it leaves him/her speechless and scramble to find an answer wherever possible.

After seemingly innocent deployment to production, I noticed huge spike in errors like the following:


ActionView::Template::Error: "\xEB" from ASCII-8BIT to UTF-8

Offending line was JSON encoding of geo location information provided in request header by our cache provider.

\xEB

happens to be

ß

character in ASCII, so it was probably some German city name.

Our site’s character type is UTF-8, and Ruby 2.0’s default encoding is UTF-8. I also verified that

Encoding.default_internal

and

Encoding.default_external

are both UTF-8. It was our cache provider inserting non-UTF-8 character in request header.

No problem. I will just force UTF-8 encoding on the string.

Then, I was faced with another kind of problems.


ActionView::Template::Error: partial character in source, but hit end

Something is off.

Off to the best debugging method in Ruby – print the string encoding. And it’s ISO-8859-1 (or Latin-1).

So, the final solution was to force ISO-8859-1 encoding and encode it again in UTF-8.


string.to_s.force_encoding("ISO-8859-1").encode("UTF-8")

However, I am not 100% happy with the solution. It just smells. It works for now, but I need to look for better solution when I get a chance.

For bonus, check this out – [The Absolute Minimum Every Software Developer Absolutely, Positively Must Know About Unicode and Character Sets (No Excuses!)][1]

MongoDB Query Performance Gotchas

At my current job, we use mongodb as our main database and as you can imagine we query our database a lot. The followings are what I found while investigating some slow performance. Hopefully it will prevent you from making the same mistake or pinpoint the source of problem quickly. We are using Rails 4 with Mongoid.

1. Don’t use regular expression with

/i

in queries.

One of the offending query looked pretty innocent. Customer is embedded document with email attribute and email field is indexed.


def self.with_email(email)
  self.where("customer.email" => /\Aemail\z/i).count
end

When I ran

Benchmark.bmbm

where the method was repeated 100 times, it returned the following result.


       user     system      total        real
   0.090000   0.010000   0.100000 ( 27.656723)

Compare that with when you call the same without regexp.


def self.with_email(email)
  self.where("customer.email" => email).count
end

Performance result is day and night.


       user     system      total        real
   0.080000   0.000000   0.080000 (  0.122888)

So, why the difference? I couldn’t quite figure it out myself. I knew that Mongodb uses B-Tree for index and index for email was already created. What about the regular expression was making it slow? I thought perhaps the anchor tags (

\A

and

\z

) were causing it, but that wasn’t it. I tried using substring of email and anchoring the beginning of email string (using

^

), but that didn’t yield difference either.

I finally turned to Stack Overflow for assistance, and within a few minutes, someone provided exact answer I was looking for. They key to the answer was in output of

explain

method.

Look at the

nscanned

and

indexBounds

in the output of explain method for the first method. It scanned all index because the upper and lower bounds are not defined (

""

and

{}

).


{
                     "cursor" => "BtreeCursor customer.email_1",
                 "isMultiKey" => false,
                          "n" => 781,
            "nscannedObjects" => 781,
                   "nscanned" => 500000,
    "nscannedObjectsAllPlans" => 781,
           "nscannedAllPlans" => 500000,
               "scanAndOrder" => false,
                  "indexOnly" => false,
                    "nYields" => 1397,
                "nChunkSkips" => 0,
                     "millis" => 406,
            "indexBounds" => {
    "customer.email" => [
        [0] [
            [0] "",
            [1] {}
        ],
        [1] [
            [0] /test/i,
            [1] /test/i
        ]
    ]
  }
}

Compare that to the output of explain method for the second method. Exactly the same upper and lower bounds, and it only scanned extremely small number of objects. This explains the big performance difference between the two methods.


{
                     "cursor" => "BtreeCursor customer.email_1",
                 "isMultiKey" => false,
                          "n" => 230,
            "nscannedObjects" => 230,
                   "nscanned" => 230,
    "nscannedObjectsAllPlans" => 230,
           "nscannedAllPlans" => 230,
               "scanAndOrder" => false,
                  "indexOnly" => false,
                    "nYields" => 1,
                "nChunkSkips" => 0,
                     "millis" => 0,
            "indexBounds" => {
    "customer.email" => [
        [0] [
            [0] "test@email.com",
            [1] "test@email.com"
        ]
    ]
  }
}

2. Don’t convert collection to array

Another slow performance was due to the following line of code. ProductA collection had about 20 documents and ProductB collection had about 2 documents. Another seemingly innocent code, but why?


products = ProductA.all + ProductB.all

Back to measuring performance with Benchmark (this time I just did it with Benchmark.bm).


Benchmark.bm do |x|
  x.report {n.times {|n| products = ProductA.all + ProductB.all}}
end
       user     system      total        real
  99.810000   2.630000 102.440000 (114.282440)

Let’s confirm the performance of retrieval.


Benchmark.bm do |x|
  x.report {n.times {|n| ProductA.all.count}}
end
       user     system      total        real
   0.430000   0.000000   0.430000 (  0.437339)

Benchmark.bm do |x|
  x.report {n.times {|n| ProductB.all.count}}
end
       user     system      total        real
   0.440000   0.000000   0.440000 (  0.456449)

That’s pretty reasonable performance. So, it must be something in the addition of two collections. When you add two collections using Mongoid, it returns an array, so it might be something related to converting to an array. Let’s check the performance on that.


Benchmark.bm do |x|
  x.report {n.times {|n| ProductA.all.to_a}}
end
       user     system      total        real
 110.070000   1.640000 111.710000 (117.081572)

Ah-ha! Looks like we found the problem. Converting to an array is quite slow. In order to use single collection, without converting to an array, I created a parent class – ProductParent, and ProductA and ProductB would inherit from that class. In such way, one collection is used and subclasses are distinguished by just

type

field. Actually, it should have been parent/subclass structure since ProductA and ProductB are kinds of a Product, and both share many of the same attributes.

After the re-arrangement, the following is the performance.


Benchmark.bm do |x|
  x.report {n.times {|n| ProductParent.all.count}}
end
       user     system      total        real
   0.480000   0.010000   0.490000 (  0.490489)

What a difference it made!

Finding these two performance gotchas have been a fun journey, and I hope they are useful to you. Do you have any gotchas you have found? Let me know, and I will post a link here!

How to create a (simple) watch app on Pebble

It’s been a couple of months since I joined Pebble as a full-stack web developer. Most of people know Pebble by its phenomenal success in its Kickstarter campaign – raising more than $10M. Pebble is also known as the company that started the smartwatch/wearable market.

Ever since I started, I have come to like a few watch apps and faces, and I’ve always wanted to create something on my own (since I like to build things). Even though we have a hack day every other week, I wasn’t able to participate because of things that needed to get done.  But today was a special one. It was hack night, instead of hack day, and I was able to participate.

In today’s hackathon, I built a simple app that displays a short quote like Unix fortune using Pebble’s pebblejs and CloudPebble. It was super easy. Almost too easy. I don’t interact with our dev evangelist team much, I have new respect for those guys. They worked hard to make it easy for developers to develop apps on Pebble.

I have shared my code on my github account.  You should check it out, and it should be self-explanatory. Use pebblejs as reference to look up functions.

https://github.com/yangtheman/fortunes_pebble_app

Here we go.

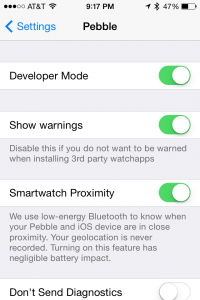
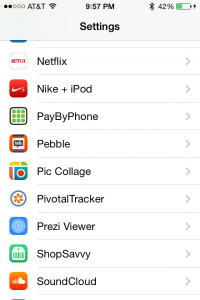
1. Enable Developer Mode on your mobile phone. On iPhone: Settings > Pebble > Developer Mode > On

IMG_3529

IMG_3527

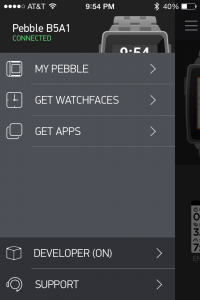
2. Enable Developer Mode on Pebble mobile app. On iPhone: Pebble App > Settings (where you see My Pebble) > Developer > Enabled

IMG_3528

IMG_3530

3. Log in to CloudPebble using the same username and password as one you created when you first set up Pebble.

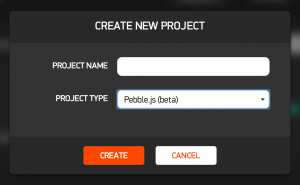
4. Create a new project and select Pebble.js as Project Type.

Screen Shot 2014-07-17 at 10.02.49 PM

5. Click on app.js on the left column.

Screen Shot 2014-07-17 at 9.32.22 PM

6. If you want, you can leave the default code as it is. Or you can copy and paste my code in pebble-js-app.js. Don’t publish your app using my code as it is, but you are certainly welcome to try it out and tweak it!

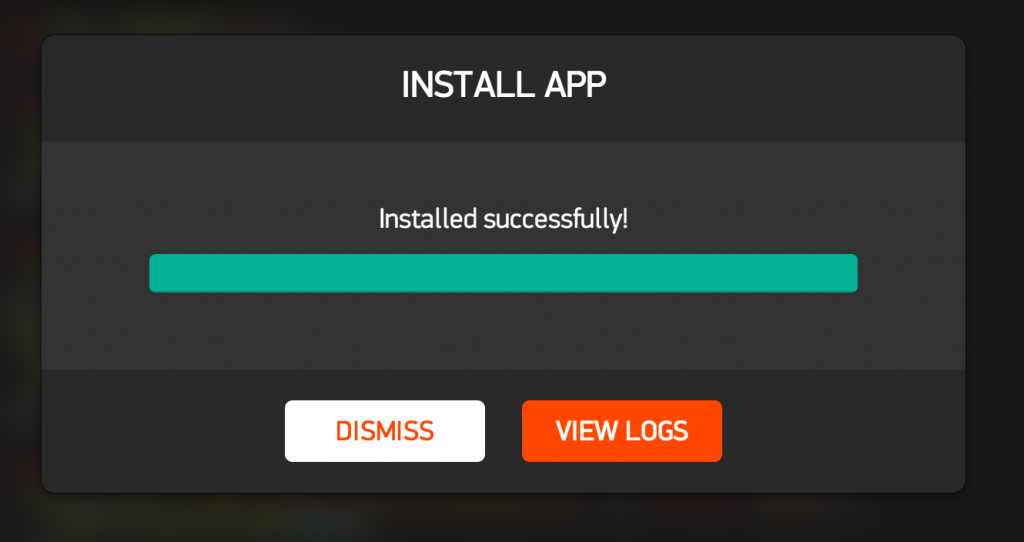
7. When you want to see the app run on the watch, click on the white Play button with green background on the right side of the screen. This should automatically compile and install the app on your watch. Make sure you have an empty slot in the locker on Pebble mobile app. If compile/install fails, toggle developer mode on Pebble mobile app as in step 2 above and try again. If you have any debug statements using console.log, you will see the log messages in ‘View Logs’ as you interact with the app.

Screen Shot 2014-07-17 at 9.32.12 PM

8. You can change your code and compile/run until you are satisfied. Next steps are for publishing the app on Pebble App Store.

9. Get some screenshots from your watch app. From CloudPebble, click on COMPILATION link. Then click on SCREENSHOT button. It will take screenshot of what’s on the watch. Take a couple of different screenshots.

Screen Shot 2014-07-17 at 9.41.50 PM

10. Get the PBW file. In COMPILATION view, you will see a list of builds. You probably want to grab the latest one (assuming the last build is the one you want to publish).

11. Log in to Pebble Dev Portal using the same username and password as one you created when you first set up Pebble, and click on Publish a Pebble App button.

10. In our case, we are adding a watch app, so click on Add a Watchapp link on the left.

Screen Shot 2014-07-17 at 10.09.01 PM

12. Filling out the form should be pretty straight forward.

12.1. For icons, make sure they are Black with White background. Do not use transparent background. 

12.2. Use the screenshots you downloaded earlier for screenshots.

12.3. You can be as creative as your want for the header image.

13. Once you are done, hit CREATE button at the bottom of the page.

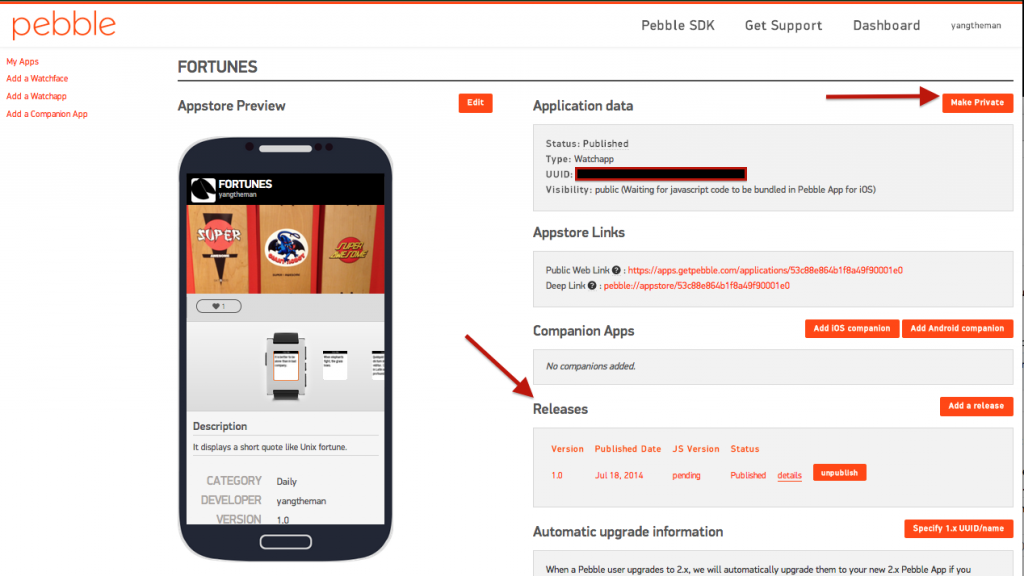
14. You are not quite done yet. Lastly, go down to Releases section and publish your first version. 

Screen Shot 2014-07-17 at 10.11.01 PM

15. After that you can make your app public by clicking on the Make Public button on the top right corner of the page.

16. Ta-Da! Your app is ready on Android platform first. It will take a day or two to appear on iOS platform. There you go. You now successfully created and published the first app!

Install ImageMagick on Lion from source

I’ve had a lot of problems trying to install ImageMagick using brew. Use the following series of commands to install from source. Got this from Stackoverflow answer.

cd /tmp
curl -OL ftp://ftp.imagemagick.org/pub/ImageMagick/ImageMagick.tar.gz
tar -xzf ImageMagick.tar.gz
cd ImageMagick-[VERSION]/
./configure --prefix=/usr/local --disable-static --with-modules --without-perl --without-magick-plus-plus --with-quantum-depth=8 --disable-openmp --with-gs-font-dir=/usr/local/share/ghostscript/fonts
make
sudo make install

Simple Ruby on Rails app using Twilio API

Twilio created cloud telephony services made mainly for developers. I’ve been meaning to figure out how to use their service, and I had a chance to develop a Ruby on Rails app using Twilio app called Phonein. You can check out the source code here. It’s nothing fancy, and totally not optimized. I also used Twitter’s Bootstrap CSS/JS package.

While Twilio had a few samples for Ruby on Rails, it was kind of outdated and a few things were incorrect. I wanted to share what I did to use Twilio API to help you come up to speed quickly.

Basically my app is for home-care professionals, and it allows them to check in and out using client’s phone. For Twilio, the followings are its requirements.

  • Identify client by phone number
  • Identify home-care professional by 6-digit identification code
  • Check in the home-care professional at the client’s location
  • Read out tasks for the home-care professional
  • Check out the home-care professional from the client’s location

Twilio has its own markup language called TwiML, and in Twilio controller I created, TwiML is used to create views (or voices). I also created certain POST actions under Twilio controller that will receive input from phone (digits punched in by a person) and use it to look up information.

1. Answer incoming call

When you sign up with Twilio, you can configure destination URL Twilio will invoke when it receives an incoming call. For mine, it would be “http://phonein.herokuapp.com/twilios/incoming”. So, I have “incoming” action defined in “Twilios” controller.

Controller in app/controller/twilios_controller.rb

Just like a regular Ruby on Rails app, controller gets objects ready for the view. It looks up client using the incoming phone number. If client is not found, it says (instead of displaying) an error message and hangs up. If client is found, it asks user to enter a 6-digit code. @post_to object contains URL that will be invoked after user interacts with Twilio. In our case, it’s after user enters code.

  
class TwiliosController < ApplicationController      
  BASE_URL = "http://phonein.herokuapp.com/twilios"         

  def incoming          
    # Get client by phone number          
    client_phone = params['From'][2..params['From'].size]          
    @client = Client.find_by_phone(client_phone)               
    
    if @client.nil?               
      render :action => "no_client.xml.builder"
    else
      @post_to = BASE_URL + "/verify?client_id=#{@client.id}"
      render :action => "incoming.xml.builder", :layout => false
    end
  end
end

View in app/views/twilios/incoming.xml.builder

xml.instruct!
xml.Response do
  xml.Gather(:action => @post_to, :numDigits => 6) do
    xml.Say "Welcome to #{@client.name}'s residence. Please enter your 6 digit code."
  end
end

View in app/views/twilios/no_client.xml.builder

xml.instruct!
xml.Response do
  xml.Say "Client could not be found."
  xml.Hangup
end

2. Verifies home-care professional, checks in, and reads tasks.

Next, look up the home-care professional by the 6-digit code. The numbers user punched will be in ‘Digits’ parameter. If user is found but has not checked in before, it checks in the user and gives some options. If user has already checked in before, user is presented with a few options including an option to check out.

Controller in app/controller/twilios_controller.rb

In addition to incoming action.

class TwiliosController < ApplicationController   

  def verify     
    @client = Client.find(params[:client_id])         
    @agent = Agent.find_by_code(params['Digits'])          
    if @agent.nil?       
      # If no agent is found, say "no agent found" error message and hang up.       
      @post_to = BASE_URL + "/verify?client_id=#{@client.id}"       
      render :action => "no_agent.xml.builder"
      return
    else
      if @agent.checked_in?(@client.id) 
        @message = "You have already checked in."
      else
        @agent.check_in(@client.id)
        @message = "Now you are checked in."
      end
    end 

    # Default action is direction
    @post_to = BASE_URL + "/direction?agent_id=#{@agent.id}&client_id=#{@client.id}"
    render :action => "direction.xml.builder", :layout => false
  end
end

View in app/views/twilios/direction.xml.builder

xml.instruct!
xml.Response do
  xml.Gather(:action => @post_to, :numDigits => 1) do
    xml.Say "Welcome #{@agent.name}."
    xml.Say "#{@message}"
    xml.Say "Please press 1 to read the task. Press 2 to check out. Press 3 to hear about Yang. Or Press 4 to hang up."
  end
end

View in app/views/twilios/no_agent.xml.builder

xml.instruct!
xml.Response do
  xml.Gather(:action => @post_to, :numDigits => 6) do  
    xml.Say "Agent could not be found. Please enter your 6 digit code."
  end
end

3. Read tasks, check out or hear about Yang

In addition to incoming and verify actions.

This is where main messages are configured and played. Depending on the option user chooses, it will either 1) say the tasks again, 2) check the user out, 3) say a few things about Yang, or 4) just hang up.

class TwiliosController < ApplicationController   

  def direction         
    @client = Client.find(params[:client_id])     
    @agent = Agent.find(params[:agent_id])     
    @message = @client.task_list     
    @post_to = BASE_URL + "/direction?agent_id=#{@agent.id}&client_id=#{@client.id}"          

    # 1 to hear the tasks again, 2 to check out, 3 to hang up.     
    if params['Digits'] == '1'       
      render :action => "direction.xml.builder", :layout => false
    elsif params['Digits'] == '2'
      @agent.check_out(@client.id)
      @goodbye_message = "Thank you for your service today."
      render :action => 'goodbye.xml.builder', :layout => false
    elsif params['Digits'] == '3'
      @message = "Yang is the most awesome guy ever - both personally and professionally. He is pretty sexy, too."
      render :action => 'direction.xml.builder', :layout => false
    elsif params['Digits'] == '4'
      @goodbye_message = "Have a great day."
      render :action => 'goodbye.xml.builder', :layout => false
    end
  end
end

View in app/views/twilios/goodbye.xml.builder

xml.instruct!
xml.Response do
  xml.Say "#{@goodbye_message}"
  xml.Say "Good-bye."
  xml.Hangup
end

Have fun!

That’s it! My codes are so not refactored and optimized. I did it to see what I can do with Twilio app. I hope this gives you a tip of what you can do with Twilio API. Go bananas!

How to install Ubuntu on Chomebook (CR-48) and put parental control

I have had a couple of first-generation Chromebook (CR-48) for a while. I thought these would be pretty good portable computing devices to give to my kids. However, I wasn’t ready to do so unless there was some sort of parental control. As someone who spends a lot of time online, it’s too rough place for kids to roam around. I have known about their support for dev mode, and I decided to figure out which linux flavor would support CR-48.

First search attempt turned out Ubuntu, and since Ubuntu is known for better UI, I decided to give it a try. I also found out there is an excellent parental control guide on Ubuntu as well.

Install Ubuntu on Chromebook (CR-48)

There is no need to re-invent the wheel. Follow instruction here to put Ubuntu 11.04 on Chromebook (CR-48). It worked out like a charm.

Parental Control on Ubuntu

There is a great guide here, and I couldn’t get the Web Content Control to work. However, timekpr is pretty good. You should at least install that.

For filtering content, ProCon Latte Content Filter Firefox Add-on has been working pretty well.

So far, I have been happy with Ubuntu on CR-48. It’s slow and keypad doesn’t work too well, but I think kids are just happy to have their own laptops. :)

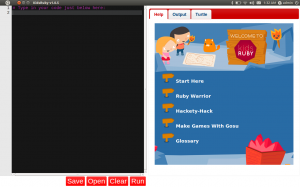
How to install KidsRuby on Mac OS X and Ubuntu

I have two kids, and I have been wanting to find ways to introduce my kids to programming. Especially for my son, who has asperger syndrome. I thought programming would be a good way to use his interests in logic and mathematics to good use.

I was so much in joy when I found KidsRuby. It’s an awesome project. I think Ruby is a great first language because of its elegance and object-oriented nature to the core.

Previously I had a hard time installing KidsRuby my Mac OS X, due to qt installation error. I was able to at least get it going by cloning their git repository. I had filed a bug for the qt installation error, and the author responded some time ago, but I hadn’t had time to verify it.

I finally had time to verify it, and it worked like a charm.

I also had converted two first-generation Google Chromebooks to use Ubuntu to give to my kids. And while I was familiar with Fedora, this was my first time using Ubuntu, and as new user, I had to search around the net to install Ruby and to install KidsRuby. I am close to finishing it, and I will describe it here.

Mac OS X

This one is pretty easy. Just download the installer dmg file from here, and follow the instruction. It will take a while, but it would be well worth it. You can find the KidsRuby folder in Application folder.

Ubuntu

Now, this one took a while. If you have Ruby installed already, you are good to go. If not, follow the direction below.

If Ruby isn’t installed

You can simply follow the direction from Ryan Bigg to install Ruby 1.9.3.

If Ruby is already installed

I am not sure which version of Ruby is supported, but this applies to Ruby 1.9.3.

The biggest problem I faced was the problem with ffi gem. I kept getting the following error.

Installing ffi (1.0.10) with native extensions
Gem::Installer::ExtensionBuildError: ERROR: Failed to build gem native extension.

        /usr/bin/ruby1.9.1 extconf.rb
:29:in `require': no such file to load -- mkmf (LoadError)
	from :29:in `require'
	from extconf.rb:4:in `'

Gem files will remain installed in /usr/share/kidsruby/ffi/ruby/1.9.1/gems/ffi-1.0.10 for inspection.
Results logged to /usr/share/kidsruby/ffi/ruby/1.9.1/gems/ffi-1.0.10/ext/ffi_c/gem_make.out
An error occured while installing ffi (1.0.10), and Bundler cannot continue.
Make sure that `gem install ffi -v '1.0.10'` succeeds before bundling.

After searching the net for a while, I realized that I needed to install “-dev” package as well. Since I am using 1.9.3, I had to install ruby1.9.1-dev.

sudo apt-get install ruby1.9.1-dev

After that you can clone the git repository and install necessary packages.

git clone https://github.com/hybridgroup/kidsruby.git

cd kidsruby

sudo apt-get install libqt4-dev
sudo apt-get install cmake
gem install qtbindings
bundle install

The bundle install part will take a while.

For the lesson part, I had a surprising result – my son totally lost interest very quickly, but my daughter was more into it. :)

KidsRuby on Ubuntu

Lean Startup in Education (Hacking for Education)

Today I have had the most productive conversation with my wife (which is shame because I think she has a lot of good insights and look at things from different view points). It was inside the car, while we were driving to Lawrence Hall of Science, which is an awesome place all around.

I had to leave my most current job abruptly, and knowing the reasons behind it, she asked me what’s the most important element angel investors look before making an investment. It was an easy question to answer – the team, of course. And she wholeheartedly agreed. She said she experienced exactly the same at her Korean school, where she teaches grade school kids, and at Korean American Community Center, where she worked before working at the Korean school.

The Korean school she teaches at is part of a church (I am an atheist, but I welcome all religions), and thus their curriculum is not directed or regulated by school district. She said she and a few other teachers like to try new ways of teaching kids. Their attitudes were just like those of tech startup founders. Failure is okay, since you will learn more from failures and apply it to the next new idea. However, she said there were other teachers who are very resistant to trying new things even if they are not the ones implementing or preparing the experiment. Not only do they waste time, they also put out the passion brought on my good teachers. So, she understood how important the team is. Not everyone in the team needs to be super smart, but it’s important for the team to be open to experiments, not be afraid of failures and support each other.

She said she saw the same thing at the Korean American Community Service. She worked there as an office manager until our first child was born. The community center reached the peak while she was there, because she said everyone was open to trying new things – services or classes or whatever – to serve the community better. And most of all, they had the full support from the head of the community center. She also said amazing thing about leadership. Good leadership is not about leading, but creating an environment for team members to innovate. You shouldn’t try to make everyone follow your views, thoughts or directions, but instead give team members freedom to experiment, learn from successes/failures and move  forward. I was like DANG! That’s the most insightful thing I heard from my wife (again, I should have more conversations with her) . :)

I told her that’s the exact operating principal for tech startups these days. I couldn’t believe we were in such unison! And it got me thinking about our education system.  Many people are concerned about our failing education system, and WE HAD THE ANSWER ALL ALONG! Apply “Lean Startup” principal to our education. Encourage teachers to take 20% of their time to innovate. It’s not possible without school district’s support, but if there is, it’s totally doable. And have Lighting Talk or Lesson Learned sessions with other teachers so that they could learn from others’ successes or failures. And pivot if an idea didn’t work out. Or perhaps we need an national website for teachers to share their experiments and lessons learned from them. I truly believe this HACKING FOR EDUCATION will save us, and put our great nation again in leading position.